

User’s Manual of Helmholtz Coils
1. Introduction
Helmholtz Coil, homogeneous area is big, and the use of the space is open, also easy to handle. It Can achieve that one-dimensional, two-dimensional and three-dimensional combination of the magnetic field, providing ac and dc magnetic field, and electric current and magnetic field can have a good linear relationship. It apply to institutes, institutions of higher learning and enterprises material or magnetic detection experiment, applied to materials, electronics, biological, medical, aerospace, chemical, applied physics and other subjects, Its main use: produce standard magnetic field; Offset and compensation of the earth's magnetic field, the magnetic environment simulation, judgment of magnetic shielding effect, electromagnetic interference simulation experiment, hall sensor and all kinds of magnetometer calibration, biological magnetic field research and the study of the magnetic properties of the material.
2. Working Principle
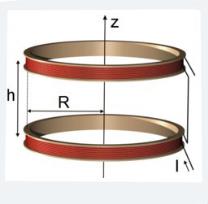
Helmholtz coil consists of one couple the same round conducting coils. The center axis of these two round coils with R radius is the same as Z axis. The distance between these two coils is h=R. The number of turns of these two coils is the same, and each coil has homodromous current I. The value of current has a good linear relation with the magnetic field value.
3. Introduction of structure
|
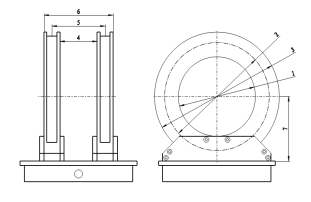
Each part of Helmholtz |
||||
|
1: Coil inner diameter |
2: Average diameter |
3: Coil outer diameter |
4: Inner distance |
5:Average distance |
|
6: Outer distance |
7: Center height |
|
|
|
|
A: Inner distance of X axis |
B: Inner distance of Y axis |
C: Inner distance of Y axis |
|
|
One-dimensional coil
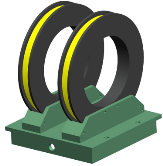
Feature: The space of the magnetic field is wide. The direction of the magnetic field is horizontal or vertical. It could achieve a rather high magnetic field. The highest magnetic field could reach 10000Gs. It could be used for the standard magnetic field, calibration of hall probe and magnetometer, the study of biological magnetic field and analysis of object performance.
Two-dimensional coil
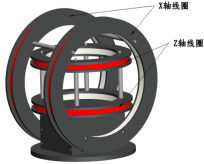
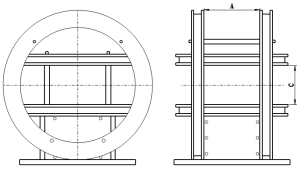
Feature: The space of the magnetic field is wide. Generally, the magnetic field is X or Z. The magnetic field of these two axes could reach 100Gs at the same time. It could be used for the standard magnetic field, calibration of hall probe and magnetometer, the study of biological magnetic field and analysis of object performance.
Three-dimensional coil
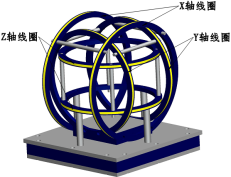
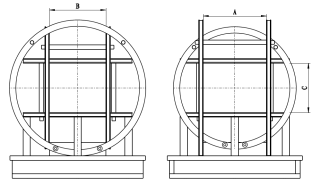
Features: The magnetic field could realize the magnetic field in X, Y Z directions. Generally, the magnetic field of each axis is low, which is especially suitable for the standard magnetic field, the counteract and compensation of the earth magnetic field, the simulation of earth magnetic field surrounding, judgment of magnetic field shield, the simulating experiment of electromagnetic interference, calibration of hall probe and magnetometer, the study of biological magnetic field and analysis of object performance.
Square coil
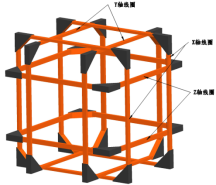
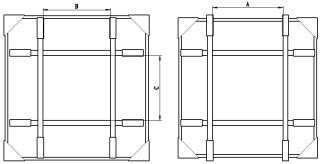
Features: It has a large uniformity area and wide space, which is generally used in larger sample tests. The side length could reach 1 meter or several meters. It could be designed to one—dimensional, two-dimensional, and three-dimensional. It is especially suitable for the standard magnetic field, the counteract and compensation of earth magnetic field, the simulation of earth magnetic field surrounding, judgment of magnetic field shield, the simulating experiment of electromagnetic interference, calibration of hall probe and magnetometer, the study of biological magnetic field and analysis of object performance.
Peculiar shape coil
It is transformed from a standard Helmholtz coil, whose aim is to get the largest uniformity area in limited space. Some coils is limited by building space, lab condition, volumetric of shield chamber or supplied power. In such condition, the design of peculiar shape coil is very important.
4. Connect to power and calibration
1) The connecting of power supply.
The winding of dimension is series connection or in parallel before sent out. The Amphenol connector generally adopts aviation socket, binding post, line bank, banana socket and so on. User just needs to connect the Amphenol connector to the output end of power supply. The three-dimensional coil has 3 units Amphenol connector. Usually, three-dimensional coil is respectively controlled by 3 sets power supply.
2) Turn on power supply to calibrate
Before turning power supply, please zero the current and voltage (some specified power supply does not need to adjust voltage).
a. Turn on the power supply, increase the voltage of power supply from the lowest to the state which shows the power supply is constant state. (Some specified power supply does not need to do this process).
b. Adjust the current from the lowest to higher, place the probe of gaussmeter or teslameter to the center of coil. At this time, if you see the magnetic field strength is increased with the increase of current, which shows the connection is correct and you could normally use the coil.
5. Operation method
1) Working condition
a. Temperature: 5℃-30℃
b. Relative humidity: less than 70%
c. Without corrosive gas and insulation harmful gas
d. Without other electromagnetic interference device
2) Installation and operation of coil (making example of three-dimensional coil)
Usually, the construction of one-dimensional coil and small two-dimensional coil and three-dimensional coil is fixed. The coil is shipped in whole construction, without installation. The following calibration steps are for large coil and need to be installed as site.
a. Calibration three-dimensional coil
I. Refer to the installation manual, assemble the coil
II. Check the tap of each winding and test the resistance, note the serial connection or parallel connection of each winding to make sure the winding of two coils is the same.
III. Find one set winding and connect it to power supply. As for single winding unit, the negative and positive of power supply has not relation to the direction of winding.
IV. Place the gaussmeter or magnetometer in to center of magnetic field, please note the direction of probe and observe the reading of magnetic field. Turn on the power supply, adjust the current from low to high. At this time, if the magnetic field strength has linear variation with the current, which means the connection is correct.
V. Repeat the II and IV steps to connect each winding unit to power supply correctly.
VI. Compare the technical parameter and test the magnetic field index,
VII. Test and adjust the perpendicularity of three-dimensional coil: place the high precision 3D probe in the center of coil, make the power supply of three-dimensional coil to output constant current, observe the magnetic field value of each dimension and respectively adjust the mechanical angle of each dimension to let magnetic field of each dimension to each the largest value.
VIII. Test the uniformity degree of uniformity area: Let the output of power supply to a certain value and wait for stable. Test the center magnetic field and steady move the meter in the uniformity are and make sure the probe rotate without tiling. Record the magnetic field of each point in uniformity area. If the center magnetic field is H0, the magnetic field of other point in the uniformity area is H1, so the difference of magnetic field isΔH=H1-H0, and the uniformity degree of this point is ΔH/H0
IX. After calibration of coil, record the magnetic field of each coil/ current constant.
b. Use of coil
I. Turn on the power supply and pre-heat 30-40 minutes, wait unit the power is stale and then begin operation.
II. Check the magnetic field/current constant of each coils. If finding the constant and uniformity degree change, please re-calibrate the coil.
III. Set the magnetic field change program, begin to test the sample, and the test meter monitor the magnetic field at the same time.
IV. After finishing the test, turn off the power supply and cut off the main power.
c. Notes
I. When the coil works in large current for a long time, the winding would become heat. If the surface temperature is larger than 20℃, please stop test and wait for the cooling of coil.
II. Do not use the wet cloth to scrub the coil and power supply in order to prevent the damage insulation and electric shock.
III. Do not use metal sharp tool to stab the coil, which would cause short circuit or damage the insulation. If you want to install other accessories, please enquire Dexing Company.
IV. After the calibration coil, please do not vigorously pull and push the coil or it would cause the coil out of shape and then influence the uniformity area, uniformity degree and perpendicularity. If you need to move the coil, please calibrate the coil after moving.
V. When test the sample, please place lightly. Do not let the operator crash and tread the coil.
VI. When the coil is working, please so not let the ferromagnetic objects near the coil.
d. Trouble removal
|
Trouble |
Possible cause |
Check method |
Solution |
|
No magnetic field strength after power connecting |
The coil is open circuit. |
Check the connecting of coil and power supply. |
Connect cables |
|
Power is out of work |
Test the output of current |
Contact the power supply manufacturer. |
|
|
The disconnection of winding inside coil. |
Test the DC resistance of coil. |
Inform the manufacturer to solve |
|
|
The fault of meter or wrong test method. |
Check the direction and range of meter or change a new meter. |
Note the direction of probe whether the same as the test magnetic field direction. |
|
|
Magnetic field /current constant has a large difference or is not linear. |
The coil is out of shape. |
Check the dimension of coil |
Recover the structure after calibration. |
|
The direction of serial connection or parallel connection is opposite. |
Change the direction of coil tap and then test the magnetic field. |
Correct connection. |
|
|
The output current of power supply is not correct. |
Test the output current of power supply. |
Inform the manufacturer to maintain. |
|
|
The short-circuit inside of inner coil |
Test the DC resistance of coil. |
Inform the manufacturer to maintain. |
|
|
There is ferromagnetic substance in the magnetic field. |
|
Remove the ferromagnetic substance. |
|
|
When in high magnetic field work, the current could be adjusted to set value. |
The working time is long, the coil is heat and the resistance is high. |
Test the surface temperature of coil and the DC resistance of coil. |
Stop the usage and cool the coil. |
|
The heat of coil is not symmetrical |
The heat coil would short circuit. |
Test single coil DC resistance. |
Inform the manufacturer to maintain. |
|
Note: If the trouble is not mentioned as above, please contact Dexing Magnet |
|||

